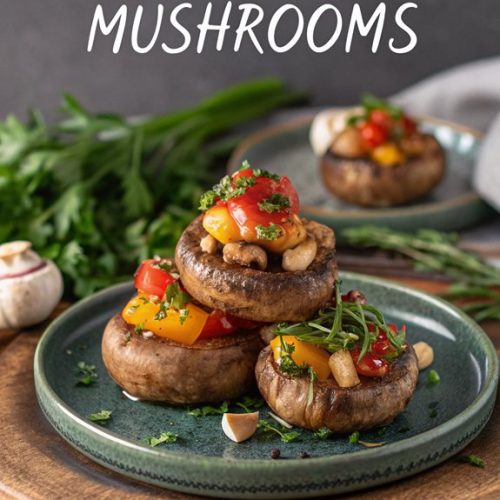
Roasted Garlic Mushrooms
Roasted garlic mushrooms can be both a simple side dish and a gourmet treat. With just a few ingredients, you can create a flavorful addition to any meal. These mushrooms are easy to prepare and cook quickly, making them a great choice for busy nights. Curious about how to make this dish and what makes it so special? Let’s explore the steps and techniques that bring out the best in these delicious mushrooms.
Why You’ll Love This Recipe
Roasted garlic mushrooms are a dish you’ll love for several reasons. First, they’re quick to prepare, taking just 20-30 minutes to cook. You only need simple ingredients like olive oil, garlic, and thyme, making it easy to whip up.
This dish is versatile, perfect as a side, appetizer, or even in a plant-based meal. Plus, the steps are straightforward: just toss everything together and bake on a sheet pan. Additionally, you’ll appreciate that they are a healthy dinner option ready in no time.
You’ll also enjoy their health benefits, as mushrooms are nutrient-rich, offering fiber, protein, and vitamins. Finally, the tender, earthy flavor combined with crispy garlic and fresh herbs creates a savory aroma that fills your kitchen, making it a delightful addition to any meal.
History
Mushrooms have a rich history that stretches back thousands of years, and their significance varies across cultures. In many ancient societies, mushrooms served culinary, medicinal, and spiritual roles.
For instance, in Asian cultures, mushrooms like Shiitake symbolize longevity and health, while traditional Chinese medicine highlights their immunity-boosting properties. Some cultures even see mushrooms as a connection between earthly life and the spiritual domain.
Indigenous tribes in the Americas also utilize mushrooms for food and ceremonies. Culinary traditions around mushrooms have evolved, with recipes like roasted garlic mushrooms being passed down through generations. Today, mushrooms are celebrated for their ability to transform dishes, making them a popular choice for quick and flavorful side dishes.
Today, mushrooms continue to influence global cuisines, showcasing their versatility and cultural importance across various regions and traditions.
Recipe
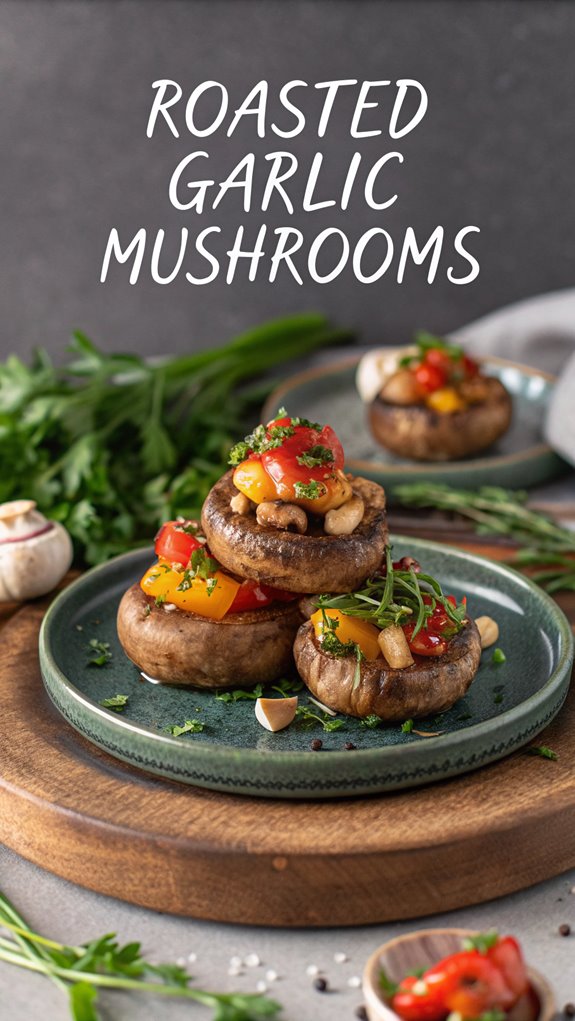
Roasted garlic mushrooms are a delicious and easy side dish that can elevate any meal. The combination of earthy mushrooms, rich garlic butter, and fresh herbs creates a mouthwatering flavor profile that’s hard to resist. These mushrooms are versatile and work well with various mushroom types, whether you’re serving them alongside a steak, pasta, or a simple salad, these roasted mushrooms will add depth and character to your plate. Plus, they’re quick to prepare and can be customized to suit your taste.
The key to achieving perfectly roasted mushrooms lies in selecting the right mushrooms and guaranteeing they’re spread out in a single layer on the baking sheet. This allows them to brown beautifully and prevents them from steaming.
With a few simple ingredients and straightforward steps, you can enjoy this savory dish in no time. Here’s how to make your own roasted garlic mushrooms.
Ingredients:
– 1 lb mushrooms (cremini, baby bella, or mixed)
– 4 cloves fresh garlic, minced (or 1 tsp garlic powder)
– 4 tbsp unsalted butter
– 1 tbsp soy sauce (or balsamic vinegar)
– 1 tsp fresh thyme (or Italian seasoning)
– 1 tsp fresh parsley, chopped
– 2 bay leaves
– Salt, to taste
– Black pepper, to taste
– Lemon zest and juice, to taste
– Red chili flakes (optional)
Cooking Instructions:
- Preheat your oven to 400°F (or 425°F for extra crispiness). This high temperature is essential for achieving that golden brown color while roasting the mushrooms.
- Rinse, dry, and trim the mushrooms to your preferred size. If using larger mushrooms, consider cutting them in half or quarters to guarantee even cooking.
- In a small saucepan, melt the unsalted butter over low heat. Once melted, stir in the minced garlic, soy sauce (or balsamic vinegar), fresh thyme, and chopped parsley. Add salt and black pepper to taste. Allow the mixture to simmer for a couple of minutes to infuse the flavors.
- On a large baking sheet, spread the prepared mushrooms in a single layer. Pour the garlic butter mixture over the mushrooms and toss them gently to coat evenly.
- Place the sheet pan in the preheated oven and roast the mushrooms for 15-20 minutes. Be sure to stir the mushrooms halfway through to guarantee even cooking and browning.
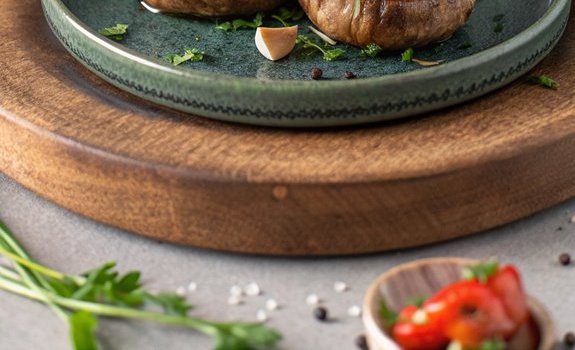
- Once the mushrooms are tender and caramelized, remove them from the oven. Discard the bay leaves, and garnish with fresh parsley, lemon zest, and a squeeze of lemon juice before serving.
For best results, serve the roasted garlic mushrooms immediately after cooking. This dish is highly versatile, so feel free to experiment with different mushrooms or herbs based on your preferences.
Additionally, consider adding a pinch of red chili flakes if you enjoy a bit of heat, or mix in some Italian seasoning for a Mediterranean twist. Enjoy the delightful flavors and textures of these roasted garlic mushrooms!
Final Thoughts
When it comes to side dishes, few can match the satisfaction of a well-prepared garlic mushroom dish. Roasting mushrooms enhances their earthy flavor and improves their chewy, crispy texture. With just 29 calories per serving, they’re a nutritious choice, offering protein, fiber, and essential minerals like potassium and iron. Additionally, they are low in calories and fat, making them a healthy option for any meal. You can easily adapt this dish by using different types of mushrooms or adding herbs and spices for extra flavor. Whether you serve them alongside a main dish or toss them into salads and pasta, roasted garlic mushrooms bring versatility to your meals.
FAQ
Have you ever wondered how to make the perfect roasted garlic mushrooms? To start, choose your mushrooms; white button, cremini, or shiitake work great. You’ll need olive oil, minced garlic, and seasonings like salt and pepper. Preheat your oven to 220°C (450°F) and toss the mushrooms with oil, garlic, and seasonings in a bowl. Roasting in garlic butter is a frequent cooking method that enhances the flavor of mushrooms. Spread them evenly on a sheet pan, making sure not to overcrowd. Roast for 10-20 minutes, flipping halfway through for even cooking. If you like, finish with a squeeze of lemon juice or some fresh herbs. Store any leftovers in an airtight container in the fridge for up to two days. Enjoy your versatile, tasty dish!
Roasted Garlic Mushrooms
- Ingredients:
- - 1 lb mushrooms cremini, baby bella, or mixed
- - 4 cloves fresh garlic minced (or 1 tsp garlic powder)
- - 4 tbsp unsalted butter
- - 1 tbsp soy sauce or balsamic vinegar
- - 1 tsp fresh thyme or Italian seasoning
- - 1 tsp fresh parsley chopped
- - 2 bay leaves
- - Salt to taste
- - Black pepper to taste
- - Lemon zest and juice to taste
- - Red chili flakes optional
Cooking Instructions:
Preheat your oven to 400°F (or 425°F for extra crispiness). This high temperature is essential for achieving that golden brown color while roasting the mushrooms.
Rinse, dry, and trim the mushrooms to your preferred size. If using larger mushrooms, consider cutting them in half or quarters to guarantee even cooking.
In a small saucepan, melt the unsalted butter over low heat. Once melted, stir in the minced garlic, soy sauce (or balsamic vinegar), fresh thyme, and chopped parsley. Add salt and black pepper to taste. Allow the mixture to simmer for a couple of minutes to infuse the flavors.
On a large baking sheet, spread the prepared mushrooms in a single layer. Pour the garlic butter mixture over the mushrooms and toss them gently to coat evenly.
Place the sheet pan in the preheated oven and roast the mushrooms for 15-20 minutes. Be sure to stir the mushrooms halfway through to guarantee even cooking and browning.
Once the mushrooms are tender and caramelized, remove them from the oven. Discard the bay leaves, and garnish with fresh parsley, lemon zest, and a squeeze of lemon juice before serving.
For best results, serve the roasted garlic mushrooms immediately after cooking. This dish is highly versatile, so feel free to experiment with different mushrooms or herbs based on your preferences.
Additionally, consider adding a pinch of red chili flakes if you enjoy a bit of heat, or mix in some Italian seasoning for a Mediterranean twist. Enjoy the delightful flavors and textures of these roasted garlic mushrooms!