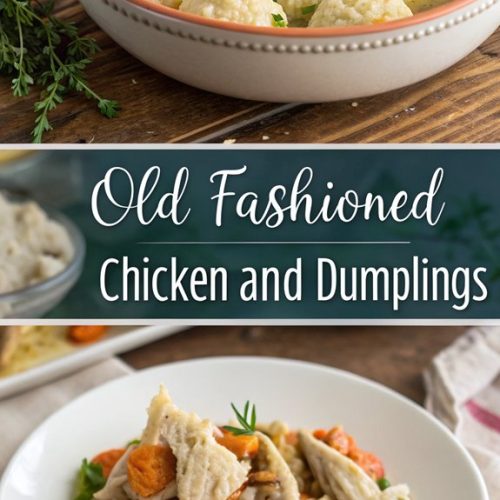
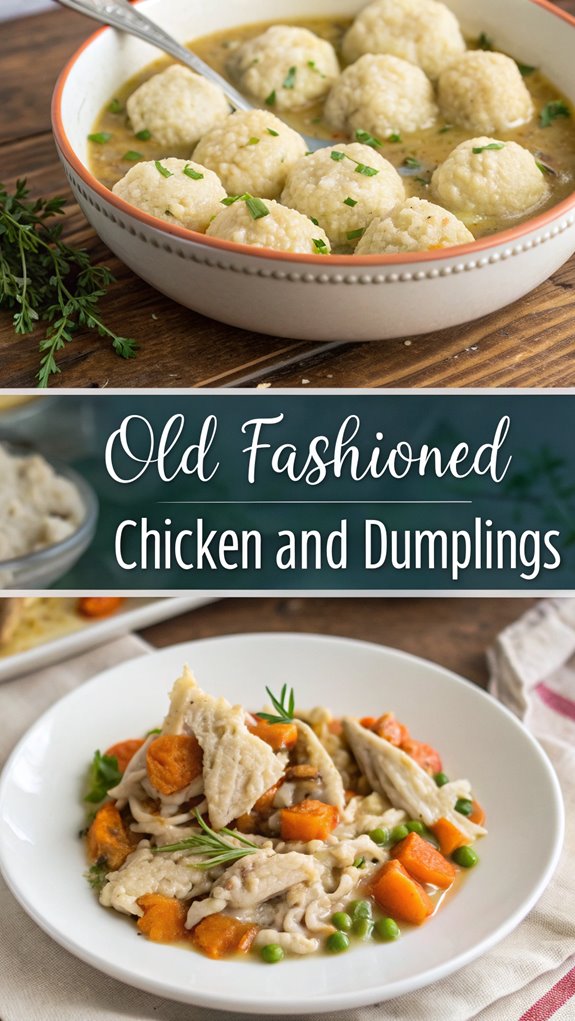
Old Fashioned Chicken and Dumplings
Did you know that chicken and dumplings has roots in various cultures, including Native American and European traditions? This classic dish has evolved over time, becoming a staple in Southern cooking. If you’re curious about how to make your own version at home, you’ll find it’s simpler than you might think. The combination of tender chicken and fluffy dumplings creates a warm, satisfying meal that many families love to share.
Why You’ll Love This Recipe
When you try this Old Fashioned Chicken and Dumplings recipe, you’ll discover several reasons to love it. First, it’s high in protein, offering 34% of your daily value per serving, along with a good source of fiber and calcium.
You’ll appreciate its versatility, too; you can choose from various dumpling styles and cooking methods, making it adaptable to your tastes. Plus, it’s a one-pot meal, simplifying cleanup. The dish is comforting and hearty, perfect for colder weather or gatherings, serving six or more people easily. Ultimately, it’s easy to prepare, requiring simple ingredients and less than 30 minutes of prep time.
This makes it ideal for busy days while still delivering delicious homemade comfort. Additionally, this recipe offers the option of using rolled dumplings, which provide a denser, pasta-like texture that many find irresistible.
History
Although chicken and dumplings may seem like a simple comfort food, its history is rich and varied, reflecting influences from different cultures and regions.
Dumplings have appeared globally, from Chinese traditions to European cuisines, dating back to the 1600s. In the U.S., early cookbooks documented recipes for dumplings, especially after the Civil War. Marion Cabell Tyree’s 1879 cookbook introduced the first recorded chicken and dumplings recipe. Flat dumplings soak up broth flavors and have a rustic, homemade appearance, which contributes to their enduring popularity.
You’ll notice two main styles emerged: rolled dumplings in the South and dropped dumplings in the North. This dish became a staple in Southern communities, symbolizing warmth and hospitality.
Over time, it evolved, with modern chefs adding their twists while families continue to cherish traditional recipes, passed down through generations.
Recipe
Ingredients:
– Whole chicken (4-5 pounds) cut into pieces or 2-3 chicken breasts
– 8 cups reduced sodium chicken broth or 6 cups boiled chicken stock
– Onion, carrots, celery (optional)
– 1 ¾ cups flour or 2 cups flour
– 2 teaspoons baking powder
– ⅓ cup shortening or 3 tablespoons oil
– ¾ cup milk or buttermilk
– Salt and black pepper to taste
– 1 bay leaf or poultry seasoning (optional)
– Parsley for garnish (optional)
Cooking Instructions:
- Begin by boiling the chicken in a large pot of hot water until tender, approximately 25 minutes. If using chicken breasts, you can bake them in the oven at 350°F for about 45 minutes instead.
- Once cooked, reserve the broth and cut the chicken into bite-sized pieces.
- In a separate pot, combine the reserved chicken broth with chopped onions, carrots, and celery if desired. Season with salt, black pepper, and add a bay leaf or poultry seasoning for extra flavor.
- Bring the mixture to a simmer.
- While the broth is simmering, prepare the dumplings. In a mixing bowl, combine the flour, baking powder, and shortening or oil. Gradually add the milk or buttermilk, stirring until a dough forms.
- Knead the dough a few times until smooth.
- Roll out the dumpling dough to a thickness of ⅛-inch or ¼-inch. Cut into strips or squares using a knife or pizza cutter.
- Once the broth is simmering, add the cooked chicken back into the pot.
- Carefully drop the dumplings into the broth one at a time, stirring gently to prevent sticking. Allow the dumplings to cook for 15-20 minutes, or until they’re fluffy and cooked through.
- If the broth needs thickening, you can mix a small amount of cornstarch with water and stir it into the simmering broth until it reaches your desired consistency.
- Stir everything together to combine and heat through.
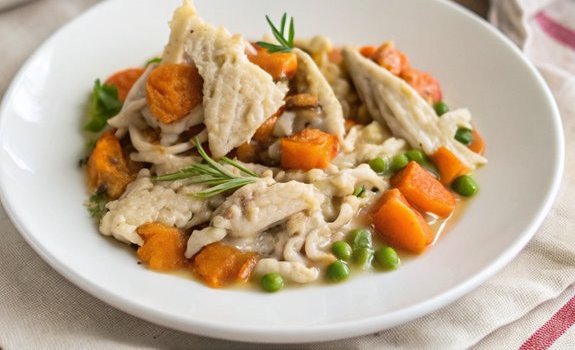
- Serve the chicken and dumplings hot, garnished with parsley if desired, and enjoy the comforting flavors of this classic dish. Dumplings are rolled out and have a pillowy texture, distinct from noodles, and can be pinched into pieces instead of rolled out.
Extra Tips: When making chicken and dumplings, feel free to customize the vegetables based on your preferences.
You can also use leftover chicken to save time. If you prefer a richer broth, consider adding a splash of cream or milk before serving.
Remember to taste and adjust the seasonings as needed for the perfect balance of flavors. Enjoy your heartwarming meal!
Final Thoughts
As you reflect on the delightful journey of making old-fashioned chicken and dumplings, remember that this dish is more than just a meal; it’s a connection to history and culture.
With roots tracing back to early American cookbooks, this comforting dish has evolved through various influences, including French Canadian and African traditions. It symbolizes a shared experience across cultures, showcasing how different regions have adapted dumplings to their unique tastes. Enslaved Africans likely contributed to the development of chicken and dumpling recipes in Southern kitchens, enriching the dish’s history even further.
While often misunderstood as a Depression-era food, chicken and dumplings were historically considered a special treat.
Each bowl you serve carries the weight of this rich history, inviting you to savor not only the flavors but also the stories behind each ingredient and technique.
Enjoy every bite!
FAQ
Wondering how to make the perfect old-fashioned chicken and dumplings? First, gather your ingredients: a whole chicken, onions, carrots, celery, and flour for the dumplings. You’ll need a large soup pot, a rolling pin, and a clean surface for kneading. Start by boiling the chicken in broth until tender, then prepare the dumpling dough by mixing flour, shortening, baking powder, and milk. Simmer the chicken until tender, approximately 1 to 2 hours, then remove it from the broth. Roll it out, cut into shapes, and gently add to the boiling broth. Cook for 15-20 minutes until the dumplings are light and tender. If your broth is too thin, mix cornstarch with water to thicken it. Finally, serve hot, garnished with parsley for a classic touch. Enjoy your meal!
Old Fashioned Chicken and Dumplings
- Ingredients:
- - Whole chicken 4-5 pounds cut into pieces or 2-3 chicken breasts
- - 8 cups reduced sodium chicken broth or 6 cups boiled chicken stock
- - Onion carrots, celery (optional)
- - 1 ¾ cups flour or 2 cups flour
- - 2 teaspoons baking powder
- - ⅓ cup shortening or 3 tablespoons oil
- - ¾ cup milk or buttermilk
- - Salt and black pepper to taste
- - 1 bay leaf or poultry seasoning optional
- - Parsley for garnish optional
Cooking Instructions:
Begin by boiling the chicken in a large pot of hot water until tender, approximately 25 minutes. If using chicken breasts, you can bake them in the oven at 350°F for about 45 minutes instead.
Once cooked, reserve the broth and cut the chicken into bite-sized pieces.
In a separate pot, combine the reserved chicken broth with chopped onions, carrots, and celery if desired. Season with salt, black pepper, and add a bay leaf or poultry seasoning for extra flavor.
Bring the mixture to a simmer.
While the broth is simmering, prepare the dumplings. In a mixing bowl, combine the flour, baking powder, and shortening or oil. Gradually add the milk or buttermilk, stirring until a dough forms.
Knead the dough a few times until smooth.
Roll out the dumpling dough to a thickness of ⅛-inch or ¼-inch. Cut into strips or squares using a knife or pizza cutter.
Once the broth is simmering, add the cooked chicken back into the pot.
Carefully drop the dumplings into the broth one at a time, stirring gently to prevent sticking. Allow the dumplings to cook for 15-20 minutes, or until they're fluffy and cooked through.
If the broth needs thickening, you can mix a small amount of cornstarch with water and stir it into the simmering broth until it reaches your desired consistency.
Stir everything together to combine and heat through.
Serve the chicken and dumplings hot, garnished with parsley if desired, and enjoy the comforting flavors of this classic dish. Dumplings are rolled out and have a pillowy texture, distinct from noodles, and can be pinched into pieces instead of rolled out.
Extra Tips: When making chicken and dumplings, feel free to customize the vegetables based on your preferences.
You can also use leftover chicken to save time. If you prefer a richer broth, consider adding a splash of cream or milk before serving.
Remember to taste and adjust the seasonings as needed for the perfect balance of flavors. Enjoy your heartwarming meal!