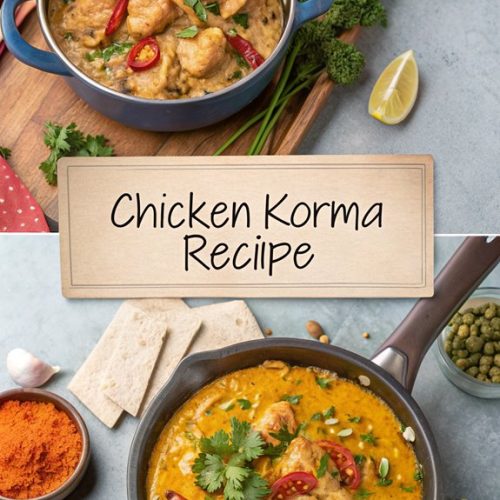
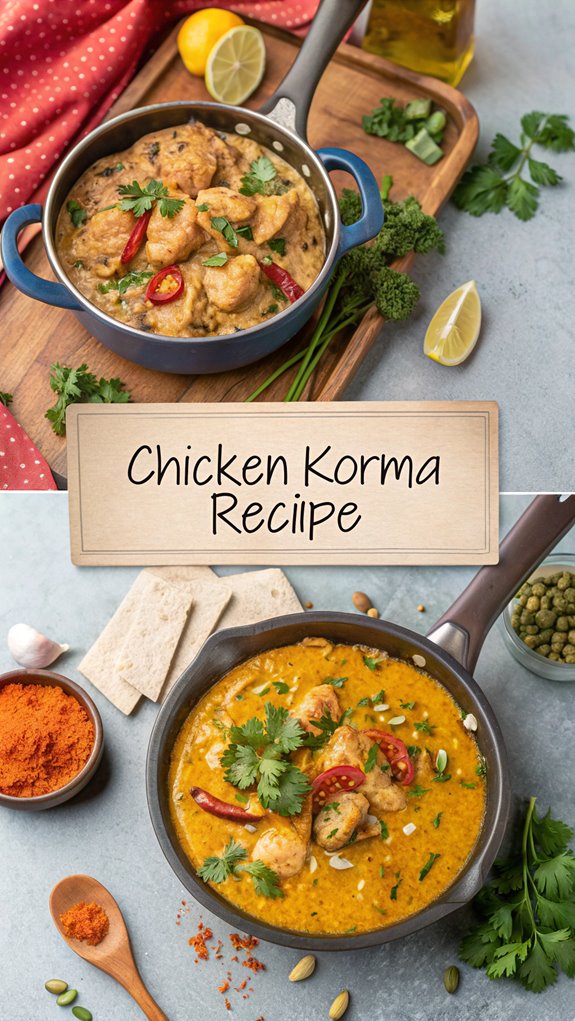
Author: admin

dutch oven sourdough bread

dutch oven sourdough bread

Dutch Oven Sourdough Bread If you want to bake a delicious loaf of bread, Dutch oven sourdough is a great choice. This method uses a cast iron pot to create steam, which helps the bread rise and gives it a crispy crust. You don’t need 

squash and pumpkin soup

squash and pumpkin soup

Squash and Pumpkin Soup Imagine a cozy autumn evening where the air is filled with the fragrant aroma of roasted squash and pumpkin. This soup is not just a dish; it’s a warm embrace on a chilly day. You’ll discover how easy it is to 

chicken korma

chicken korma

Chicken Korma

Chicken Korma is like a warm hug for your taste buds, offering rich flavors and creamy textures. This dish has a fascinating history rooted in the Mughal Empire, blending Persian and Indian influences. If you’re curious about how to create this culinary masterpiece at home, you’ll want to explore its ingredients and cooking techniques. Get ready to impress your family and friends with a dish that has stood the test of time.

Why You’ll Love This Recipe

When you try this Chicken Korma recipe, you’ll discover a dish that’s not only delicious but also packed with nutritional benefits. Each serving offers 32g of protein, making it a lean, macro-friendly option. You’ll get essential vitamins and minerals, including 40% of your daily vitamin D and 8% of potassium. The balanced macronutrients—56% fat, 36% protein, and just 8% carbohydrates—mean it fits well into many diets. Plus, it’s low in sugar at only 3g per serving. The dish is easy to prepare, with a straightforward cooking method and a quick 15-minute prep after marinating. You can customize the spices and sides, making it perfect for any occasion, from family dinners to quick weeknight meals. Additionally, the recipe includes unsweetened shredded coconut for added variation.

History

Chicken Korma has a rich history that dates back to the Mughal Empire, where it emerged as a culinary masterpiece influenced by Persian, Central Asian, and Indian traditions.

Created in the royal kitchens of Emperor Akbar, under the supervision of Mir Bakawal, Korma quickly became a symbol of luxury. It even graced the inauguration banquet of the Taj Mahal, highlighting its esteemed status.

The term “korma” comes from the Urdu word “qorma,” meaning to braise, which reflects its slow-cooked preparation in a spiced yogurt-based gravy. Mughal culinary traditions significantly influenced the techniques and ingredients used in crafting this exquisite dish.

Over time, chefs from various regions, including Turkey and Persia, added their unique touches, allowing Chicken Korma to evolve and gain global popularity while still celebrating its rich Mughal heritage.

Recipe

Chicken_Korma_0001.jpg

Ingredients:
– 500g chicken (bone-in or boneless)
– 1 cup yogurt
– 2 tablespoons garam masala
– 1 tablespoon ground coriander
– 1 tablespoon ground cumin
– 1 teaspoon ground cinnamon
– 5 cardamom pods
– 4 cloves
– 1 teaspoon salt
– 1 teaspoon turmeric
– 1-2 teaspoons chili powder (to taste)
– 1 large onion, finely sliced
– 2 tablespoons ginger, minced
– 2 tablespoons garlic, minced
– 1/2 cup cashews or almonds, soaked and blended into a paste
– 3-4 tablespoons sunflower oil or ghee
– Fresh cilantro (for garnish)
– Hot water (as needed)

Cooking Instructions:

  1. Begin by marinating the chicken. In a bowl, combine yogurt, garam masala, ground coriander, ground cumin, ground cinnamon, salt, turmeric, and chili powder. Add the chicken, ensuring it’s well-coated in the marinade. Cover and refrigerate for at least 30 minutes or up to overnight for best results.
  2. Heat sunflower oil or ghee in a large pan over medium heat. Add the sliced onions and cook until they’re golden brown, stirring frequently to avoid burning. This caramelization process enhances the flavor of the korma.
  3. Once the onions are golden, add the minced ginger and garlic to the pan. Sauté for an additional 2-3 minutes until the raw smell is gone.
  4. Add the marinated chicken to the pan, along with any remaining marinade. Cook the chicken for about 5-7 minutes, stirring occasionally, until it’s no longer pink.
  5. Incorporate the blended nut paste into the pan and mix well. Add the whole spices (cardamom pods and cloves) for added aroma. Stir everything together and allow it to cook for another 5 minutes.
  6. Pour in enough hot water to reach your desired consistency for the sauce. Cover the pan and reduce the heat to medium-low. Allow it to simmer for 20-25 minutes, or until the chicken is tender and cooked through.
  7. Adjust the thickness of the sauce as needed by adding more water or cooking uncovered to reduce it. Taste and adjust seasoning, if necessary.
  8. Once done, garnish with fresh cilantro before serving. For extra tips, remember to soak your nuts beforehand to achieve a smoother paste, and don’t rush the caramelization of the onions; it’s key to developing the rich flavor in your korma.

It’s important to note that the use of cashew nuts in the recipe helps create a creamy texture that is characteristic of a traditional korma.

Feel free to adjust the spice levels according to your preference, and consider adding a splash of rose water or kewra water for an authentic touch.

Serve your Chicken Korma hot with jeera rice or naan for a complete meal that’s sure to delight!

Final Thoughts

Although many people enjoy Chicken Korma for its rich flavors and creamy texture, it also carries a deep cultural significance that connects it to a long history. Originating from the Mughal Empire, this dish showcases the blend of Persian and Indian culinary traditions. It’s been a centerpiece at royal banquets, reflecting its importance in Indian culture. The cooking method involves slow simmering of meat in spiced yogurt-based gravy, which enhances its luxurious taste. Families often pass down their own recipes, symbolizing bonds and heritage. You’ll find various regional versions, each adding local ingredients and flavors. Today, Chicken Korma enjoys global popularity, acting as a cultural bridge that introduces people to Indian cuisine. Whether served at special occasions or family dinners, it remains a timeless tradition that unites diverse communities through its delightful taste and history.

FAQ

What do you need to know about preparing Chicken Korma? Start with key ingredients like boneless chicken, yogurt, and spices such as garam masala and turmeric.

Marinate the chicken with yogurt, ginger-garlic paste, and spices for better flavor. This flavorful dish is known for its mild heat profile, making it ideal for spice lovers.

When cooking, sauté onions and nuts, then blend them into a paste. Sauté the marinated chicken with spices, add the onion paste, and simmer with chicken stock and cream or coconut milk.

If the sauce gets too thick, add hot water; if it’s runny, simmer uncovered. Adjust the spices to your taste, and consider serving with Jeera rice or naan.

Don’t forget to garnish with cilantro for a nice touch! Enjoy your delicious Chicken Korma!

Chicken Korma

Ingredients
  

  • Ingredients:
  • - 500g chicken bone-in or boneless
  • - 1 cup yogurt
  • - 2 tablespoons garam masala
  • - 1 tablespoon ground coriander
  • - 1 tablespoon ground cumin
  • - 1 teaspoon ground cinnamon
  • - 5 cardamom pods
  • - 4 cloves
  • - 1 teaspoon salt
  • - 1 teaspoon turmeric
  • - 1-2 teaspoons chili powder to taste
  • - 1 large onion finely sliced
  • - 2 tablespoons ginger minced
  • - 2 tablespoons garlic minced
  • - 1/2 cup cashews or almonds soaked and blended into a paste
  • - 3-4 tablespoons sunflower oil or ghee
  • - Fresh cilantro for garnish
  • - Hot water as needed

Instructions
 

  • Cooking Instructions:
  • Begin by marinating the chicken. In a bowl, combine yogurt, garam masala, ground coriander, ground cumin, ground cinnamon, salt, turmeric, and chili powder. Add the chicken, ensuring it's well-coated in the marinade. Cover and refrigerate for at least 30 minutes or up to overnight for best results.
  • Heat sunflower oil or ghee in a large pan over medium heat. Add the sliced onions and cook until they're golden brown, stirring frequently to avoid burning. This caramelization process enhances the flavor of the korma.
  • Once the onions are golden, add the minced ginger and garlic to the pan. Sauté for an additional 2-3 minutes until the raw smell is gone.
  • Add the marinated chicken to the pan, along with any remaining marinade. Cook the chicken for about 5-7 minutes, stirring occasionally, until it's no longer pink.
  • Incorporate the blended nut paste into the pan and mix well. Add the whole spices (cardamom pods and cloves) for added aroma. Stir everything together and allow it to cook for another 5 minutes.
  • Pour in enough hot water to reach your desired consistency for the sauce. Cover the pan and reduce the heat to medium-low. Allow it to simmer for 20-25 minutes, or until the chicken is tender and cooked through.
  • Adjust the thickness of the sauce as needed by adding more water or cooking uncovered to reduce it. Taste and adjust seasoning, if necessary.
  • Once done, garnish with fresh cilantro before serving. For extra tips, remember to soak your nuts beforehand to achieve a smoother paste, and don't rush the caramelization of the onions; it's key to developing the rich flavor in your korma.
  • It's important to note that the use of cashew nuts in the recipe helps create a creamy texture that is characteristic of a traditional korma.
  • Feel free to adjust the spice levels according to your preference, and consider adding a splash of rose water or kewra water for an authentic touch.
  • Serve your Chicken Korma hot with jeera rice or naan for a complete meal that's sure to delight!
thai curry meatball soup

thai curry meatball soup

Thai Curry Meatball Soup Thai Curry Meatball Soup is a delicious dish that brings together flavors from ground meats, coconut milk, and vibrant vegetables. This recipe is not only easy to prepare but also allows for customization based on your dietary needs. With its spicy 

dinner ideas recipes

dinner ideas recipes

Dinner Ideas Recipes When you’re looking for dinner ideas, it’s helpful to focus on simple recipes that save time and highlight fresh ingredients. Think about dishes like shrimp spaghetti, which combines garlic, lemon, and parsley for a flavorful meal. Planning ahead can make a big 

meal plans for the week family

meal plans for the week family

Meal Plans for the Week Family

Creating a weekly meal plan for your family can simplify your cooking routine and encourage healthier choices. By assigning specific themes to each night, like Taco Tuesday or Stir-Fry Friday, you can make meal prep more enjoyable for everyone. Engaging all family members in the cooking process not only builds essential skills but also strengthens bonds. Next, let’s explore how to design an effective meal plan that suits your family’s tastes and schedules.

Why You’ll Love This Recipe

When it comes to meal planning, you’ll love this recipe for several reasons. First, it saves you money by reducing food waste and preventing last-minute takeaways, which can be expensive.

You’ll also find that it encourages healthier eating habits for you and your family, promoting a balanced diet that can help prevent childhood obesity. Additionally, this recipe fosters family bonding; it brings everyone together for quality time in the kitchen, allowing for open communication and teamwork. Plus, your kids can learn valuable culinary skills and nutritional knowledge, making cooking a fun educational experience. Cooking from scratch ultimately supports both your family’s health and strengthens relationships, all while being budget-friendly and nourishing.

History

Understanding the history of meal planning reveals how it’s evolved alongside societal changes. In the 19th century, culinary apprenticeships included shared meals, highlighting early communal eating. Inns and bars served meals meant for families, setting the stage for collective dining.

The concept of “Family Meal” gained traction with Thomas Keller’s cookbook and Chef David Waltuck’s writings, bringing family meals into focus. However, urbanization in the 1920s and the advent of TV dinners in the 1950s shifted the trend toward pre-packaged foods. Recently, research underscores the importance of family dinners, emphasizing the need for shared meals in today’s fast-paced world. In response to the challenges families face with meal planning struggles, services like Plan to Eat have emerged to simplify the process and encourage home-cooked meals.

Recipe

Meal_Plans_for_the_Week_Family_0001.jpg

Ingredients:

  • 4 boneless, skinless chicken breasts
  • 1/4 cup olive oil
  • 2 tablespoons balsamic vinegar
  • 4 cloves garlic, minced
  • 1 teaspoon dried oregano
  • 1 teaspoon dried basil
  • 1 teaspoon dried thyme
  • Salt and pepper to taste
  • Juice of 1 lemon
  • Fresh parsley for garnish (optional)

Cooking Instructions:

  1. Preheat your oven to 400°F (200°C). Line a baking dish with parchment paper for easier cleanup.
  2. In a large bowl, whisk together the olive oil, balsamic vinegar, minced garlic, oregano, basil, thyme, lemon juice, salt, and pepper until well combined.
  3. Add the chicken breasts to the marinade, making sure they’re evenly coated. Allow them to marinate for at least 30 minutes, or up to 2 hours in the refrigerator for enhanced flavor.
  4. Place the marinated chicken breasts in the prepared baking dish, pouring any remaining marinade over the top.
  5. Bake in the preheated oven for 25-30 minutes, or until the chicken is cooked through and reaches an internal temperature of 165°F (75°C).
  6. Once cooked, remove the chicken from the oven and let it rest for 5 minutes before slicing. Garnish with fresh parsley if desired.

For extra tips, make certain that the chicken isn’t overcrowded in the baking dish to allow for even cooking. Additionally, chicken dishes are often paired with complementary sides to enhance the meal experience.

You can also use a meat thermometer to check for doneness, which helps prevent overcooking.

Additionally, consider adding sliced vegetables such as zucchini or bell peppers to the baking dish during the last 15 minutes of cooking for a complete one-pan meal.

Enjoy your flavorful Italian Baked Chicken!

Final Thoughts

Meal planning can seem overwhelming at first, but by breaking it down into manageable steps, you can create a system that works for you.

Start with a master list of meals, organizing ideas into categories for easy access. Set aside time each week, like Sunday mornings, for planning, and remember to cook in bulk to save time and reduce stress. A well-structured system can lead to consistent home-cooked meals and reduce the temptation of fast food.

Incorporate dining out occasionally to keep things enjoyable. Focus on your family’s schedules and dietary preferences, and consider using themed nights to simplify choices.

Finally, don’t hesitate to share responsibilities with family members, making meal planning a team effort.

With practice, you’ll find meal planning becomes a helpful tool that eases stress and enhances your family meals.

FAQ

Have you ever wondered how to make meal planning less confusing? Start by planning meals for the busiest days of your week. Use themed nights like Pasta Mondays or Taco Tuesdays to simplify choices. Sharing responsibilities with your partner can lighten the load, too.

Focus on planning just one meal type, such as dinner, and gradually add more. Keep track of your pantry and freezer inventory to help streamline your planning. Don’t forget to include snacks in your plans! Additionally, remember that meal plans run from Thursday to Wednesday each week, which can help you organize your meals more effectively.

Flexibility is key, so be willing to adjust your meals as needed. Engaging your family in the process can make it more enjoyable and guarantee everyone’s preferences are considered.

Regularly review and refine your plans to meet your family’s needs.

Meal Plans for the Week Family

Ingredients
  

  • Ingredients:
  • 4 boneless skinless chicken breasts
  • 1/4 cup olive oil
  • 2 tablespoons balsamic vinegar
  • 4 cloves garlic minced
  • 1 teaspoon dried oregano
  • 1 teaspoon dried basil
  • 1 teaspoon dried thyme
  • Salt and pepper to taste
  • Juice of 1 lemon
  • Fresh parsley for garnish optional

Instructions
 

  • Cooking Instructions:
  • Preheat your oven to 400°F (200°C). Line a baking dish with parchment paper for easier cleanup.
  • In a large bowl, whisk together the olive oil, balsamic vinegar, minced garlic, oregano, basil, thyme, lemon juice, salt, and pepper until well combined.
  • Add the chicken breasts to the marinade, making sure they're evenly coated. Allow them to marinate for at least 30 minutes, or up to 2 hours in the refrigerator for enhanced flavor.
  • Place the marinated chicken breasts in the prepared baking dish, pouring any remaining marinade over the top.
  • Bake in the preheated oven for 25-30 minutes, or until the chicken is cooked through and reaches an internal temperature of 165°F (75°C).
  • Once cooked, remove the chicken from the oven and let it rest for 5 minutes before slicing. Garnish with fresh parsley if desired.
  • For extra tips, make certain that the chicken isn't overcrowded in the baking dish to allow for even cooking. Additionally, chicken dishes are often paired with complementary sides to enhance the meal experience.
  • You can also use a meat thermometer to check for doneness, which helps prevent overcooking.
  • Additionally, consider adding sliced vegetables such as zucchini or bell peppers to the baking dish during the last 15 minutes of cooking for a complete one-pan meal.
  • Enjoy your flavorful Italian Baked Chicken!
recipes for 2025

recipes for 2025

Recipes for 2025 As we step into the future, think of recipes as a bridge connecting tradition and innovation. In 2025, you’ll discover exciting dishes that not only taste great but also support health and sustainability. Expect more plant-based options, high-protein ingredients, and global flavors 

easy blueberry muffins recipe

easy blueberry muffins recipe

Easy Blueberry Muffins Recipe Did you know that blueberries are packed with antioxidants, making them one of the healthiest fruits around? If you’re looking for a simple, yet delicious way to incorporate these berries into your diet, you’re in the right place. This easy blueberry 

healthy chocolate banana muffins

healthy chocolate banana muffins

Healthy Chocolate Banana Muffins

If you think chocolate muffins can’t be healthy, think again! Healthy Chocolate Banana Muffins are a great way to enjoy a tasty snack while still making nutritious choices. With ripe bananas and cocoa powder, these muffins are not just delicious but also packed with fiber. Curious about how to whip up these quick treats and why they’re a perfect fit for your busy lifestyle? Let’s explore the details of this delightful recipe.

Why You’ll Love This Recipe

When you try these Healthy Chocolate Banana Muffins, you’ll quickly discover why they’re a favorite among health-conscious bakers. Packed with higher fiber content from whole wheat flour and bananas, these muffins support digestive health. The rich source of potassium from bananas makes them a smart snack choice. You’ll appreciate the use of natural sweeteners like honey or maple syrup, cutting down on refined sugar. Adding Greek yogurt or eggs gives you a protein boost, while healthier fats like olive oil replace butter, keeping them light. With only 2 tablespoons of oil used in the recipe, you can enjoy a delicious treat without the excess fat. With quick mixing and simple steps, you can whip them up in under 15 minutes. Plus, they’re freezer-friendly, so you can enjoy them anytime without the hassle of daily baking.

History

Healthy Chocolate Banana Muffins have a rich and interesting history that reflects changes in baking habits and ingredient preferences over the decades.

Early versions of banana muffins appeared in the 1950s and 1960s, influenced by the popularity of banana bread during the Great Depression. Chocolate chips were added to create a delightful variation, thanks to their increased availability in the mid-20th century.

As health trends emerged, recipes evolved to include whole wheat flour and natural sweeteners like honey or maple syrup. The rise of Healthy Chocolate Banana Muffins has particularly garnered attention for combining indulgence with nutrition, making them a favorite among families.

Today, you’ll find recipes emphasizing organic ingredients and unsweetened cocoa powder for a richer flavor. These modern adaptations prioritize health, convenience, and ease of preparation, catering to health-conscious bakers everywhere.

Recipe

Healthy_Chocolate_Banana_Muffins_0001.jpg

Ingredients:
– 2 ripe bananas, mashed
– 1 large egg
– 1/2 cup milk (almond, coconut, or regular)
– 1/4 cup maple syrup or honey
– 1 cup whole wheat flour
– 1/3 cup unsweetened cocoa powder
– 1 tsp baking soda
– 1/4 tsp salt
– 1/2 cup chocolate chips (optional)

Instructions:
1. Preheat your oven to 425°F (or 400°F if using a convection oven). This initial high temperature will help the muffins rise nicely.

  1. In a mixing bowl, combine the wet ingredients: mashed bananas, egg, milk, and maple syrup (or honey). Whisk until well blended.
  2. In a separate bowl, mix the dry ingredients: whole wheat flour, cocoa powder, baking soda, and salt.
  3. Gradually fold the dry ingredients into the wet ingredients until just combined. Be careful not to overmix, as this can make the muffins tough.
  4. Gently fold in the chocolate chips, if using, to add extra flavor and texture.
  5. Distribute the batter evenly into muffin cups, filling each about ¾ full.
  6. Bake at 425°F for 5 minutes, then reduce the temperature to 350°F and continue baking for an additional 12-15 minutes, or until a toothpick inserted into the center comes out clean.
  7. Allow the muffins to cool in the pan for about 5 minutes before transferring them to a wire rack to cool completely. These muffins are a healthier choice packed with nutritious ingredients.

For best results, make sure your bananas are very ripe for ideal sweetness and moisture.

If you want to switch things up, consider incorporating nuts or oats for added texture and nutrition.

Additionally, these muffins can be stored in the refrigerator for several days or frozen for longer preservation.

Enjoy your delicious and healthy chocolate banana muffins!

Final Thoughts

Enjoying your chocolate banana muffins is just the beginning of the journey to a healthier lifestyle. These muffins offer a delightful blend of flavor and nutrition, making them an excellent choice for breakfast or a snack.

By using whole wheat flour, ripe bananas, and Greek yogurt, you’re boosting the fiber and protein content, which helps keep you full longer. Opting for natural sweeteners like honey reduces refined sugar intake, enhancing your overall health. Plus, with high vitamin D content available, you can indulge without guilt. Remember to store your leftovers in an airtight container or freeze them for later.

Make these muffins a regular part of your diet, and you’ll be taking meaningful steps toward a healthier you.

FAQ

Have you ever wondered what makes chocolate banana muffins a popular choice for both taste and health?

These muffins often use whole wheat flour or gluten-free flour if needed. Instead of refined sugar, try natural sweeteners like honey or maple syrup. If your bananas aren’t ripe, wrap them in foil and heat them in the oven for 10-15 minutes.

For a rich flavor, choose high-quality cocoa powder. You can substitute coconut oil with canola or olive oil and add Greek yogurt for extra moisture. Super moist texture comes from using three whole bananas, enhancing both flavor and hydration.

Bake them at 425°F for five minutes, then lower to 350°F for 13-17 minutes.

These muffins are nutritious, offering fiber and protein, making them a great snack or breakfast option!

Healthy Chocolate Banana Muffins

Ingredients
  

  • Ingredients:
  • - 2 ripe bananas mashed
  • - 1 large egg
  • - 1/2 cup milk almond, coconut, or regular
  • - 1/4 cup maple syrup or honey
  • - 1 cup whole wheat flour
  • - 1/3 cup unsweetened cocoa powder
  • - 1 tsp baking soda
  • - 1/4 tsp salt
  • - 1/2 cup chocolate chips optional

Instructions
 

  • Instructions:
  • Preheat your oven to 425°F (or 400°F if using a convection oven). This initial high temperature will help the muffins rise nicely.
  • In a mixing bowl, combine the wet ingredients: mashed bananas, egg, milk, and maple syrup (or honey). Whisk until well blended.
  • In a separate bowl, mix the dry ingredients: whole wheat flour, cocoa powder, baking soda, and salt.
  • Gradually fold the dry ingredients into the wet ingredients until just combined. Be careful not to overmix, as this can make the muffins tough.
  • Gently fold in the chocolate chips, if using, to add extra flavor and texture.
  • Distribute the batter evenly into muffin cups, filling each about ¾ full.
  • Bake at 425°F for 5 minutes, then reduce the temperature to 350°F and continue baking for an additional 12-15 minutes, or until a toothpick inserted into the center comes out clean.
  • Allow the muffins to cool in the pan for about 5 minutes before transferring them to a wire rack to cool completely. These muffins are a healthier choice packed with nutritious ingredients.
  • For best results, make sure your bananas are very ripe for ideal sweetness and moisture.
  • If you want to switch things up, consider incorporating nuts or oats for added texture and nutrition.
  • Additionally, these muffins can be stored in the refrigerator for several days or frozen for longer preservation.
  • Enjoy your delicious and healthy chocolate banana muffins!
lemon blueberry scones

lemon blueberry scones

Lemon Blueberry Scones Lemon Blueberry Scones are a tasty mix of tart and sweet, making them a popular choice for breakfast or brunch. They’re not just delicious; they’re also healthier, thanks to whole wheat flour and Greek yogurt. If you want to impress your friends