dessert ideas
Dessert Ideas
You’d think the universe revolves around dessert, and in many ways, it does. When it comes to satisfying your sweet tooth, the options are practically limitless, from decadent chocolate creations to light, fruity delights. Each bite can transport you to another world, but how do you choose the perfect dessert for your next occasion? Whether you’re hosting a gathering or simply treating yourself, there are countless ideas waiting to inspire you. Let’s explore some of those possibilities and find just the right one to elevate your dessert game.
Why You’ll Love This Recipe
You’ll love this recipe for its simplicity and deliciousness. It’s designed for anyone, whether you’re an experienced baker or just starting out. With just a few ingredients, you can whip up a delightful dessert in no time. This recipe requires minimal prep, so you won’t feel overwhelmed.
You can gather items you likely already have in your kitchen, making it convenient and budget-friendly.
Begin by preheating your oven, as this step is essential for even baking. Next, measure your ingredients carefully. Following the steps closely will guarantee your dessert turns out perfectly every time. Mixing them together doesn’t take long, and you’ll be amazed at how quickly it all comes together.
Don’t forget to check for doneness using a toothpick; it should come out clean when your dessert is ready. Once it cools, you can add your favorite toppings, like whipped cream or fresh fruit.
Each bite will be a treat, showcasing rich flavors that everyone loves. This recipe not only satisfies your sweet tooth but also provides a sense of accomplishment, making it a great choice for any occasion. Enjoy the process and the delicious results!
History
Desserts have often played a significant role in various cultures throughout history. You might find it interesting that ancient Egyptians enjoyed honey cakes and fruit-based desserts, celebrating their harvests.
In medieval Europe, sugar became a prized ingredient, leading to elaborate pastries and confections that showcased wealth and status.
As you explore global dessert traditions, consider how different regions adapted local ingredients. For instance, in Asia, rice and coconut became essential components in sweet dishes, while in the Americas, indigenous peoples used chocolate and corn to create unique flavors.
The introduction of chocolate to Europe in the 16th century sparked a dessert revolution, with chocolate cakes and sauces becoming popular across the continent.
In the 19th century, technological advancements, like the invention of the ice cream maker, made frozen desserts more accessible. This period saw the rise of elaborate desserts, such as soufflés and tarts, reflecting the creativity of chefs.
Understanding the history of desserts helps you appreciate the diverse flavors and traditions that have shaped them. Each dessert tells a story, connecting us to different cultures and historical moments, making every bite a little piece of history.
Recipe
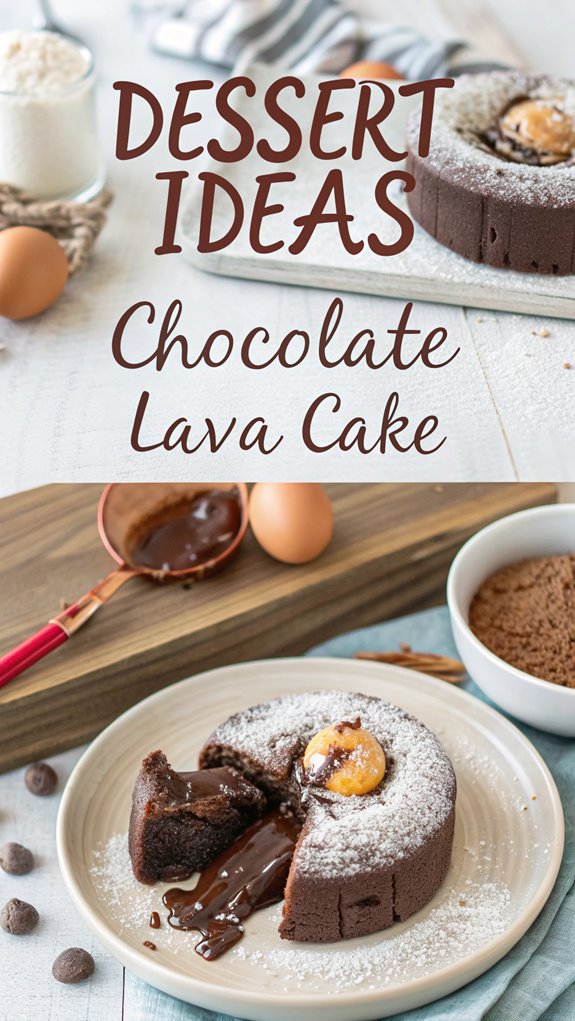
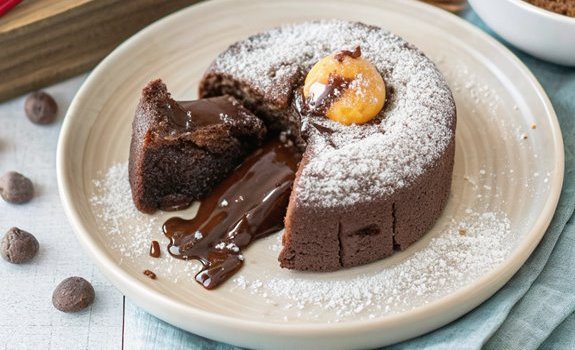
Recipe: Chocolate Lava Cake****
Chocolate lava cake is a decadent dessert that combines the richness of chocolate with the excitement of a molten center. This dessert is perfect for special occasions, dinner parties, or simply when you’re craving a sweet indulgence. The outer layer is a soft, cake-like consistency, while the inside is a warm, gooey chocolate center that flows out when you cut into it.
With minimal ingredients and an easy preparation process, you can impress your guests and satisfy your sweet tooth simultaneously. To make the perfect chocolate lava cake, it’s crucial to use high-quality chocolate, as it will greatly influence the flavor of the dish.
You can customize this dessert by serving it with a scoop of vanilla ice cream, a dollop of whipped cream, or fresh berries. The contrast between the warm cake and cold toppings is a delightful experience that everyone will enjoy. Now, let’s get started on this scrumptious recipe!
Ingredients:
– 1/2 cup unsalted butter
– 1 cup semi-sweet chocolate chips
– 2 large eggs
– 2 large egg yolks
– 1/4 cup granulated sugar
– 2 tablespoons all-purpose flour
– 1/2 teaspoon vanilla extract
– Pinch of salt
– Cocoa powder (for dusting)
Cooking Instructions:
- Preheat your oven to 425°F (220°C). Prepare four ramekins by greasing them with butter and dusting them with cocoa powder to prevent sticking.
- In a microwave-safe bowl, combine the unsalted butter and semi-sweet chocolate chips. Microwave in 30-second intervals, stirring in between, until the mixture is completely melted and smooth.
- In a separate bowl, whisk together the eggs, egg yolks, and granulated sugar until well combined and slightly frothy. This will create a light texture in the cake.
- Gradually pour the melted chocolate mixture into the egg mixture, stirring continuously to avoid cooking the eggs. Add the vanilla extract and a pinch of salt, then fold in the flour until just combined.
- Divide the batter evenly among the prepared ramekins, filling each about 2/3 full. Place the ramekins on a baking sheet for easy handling and bake for 12-14 minutes, or until the edges are firm but the center remains soft.
- Remove the cakes from the oven and let them cool for 1 minute. Carefully invert each ramekin onto a serving plate and gently tap to release the cake. Serve immediately while the center is still molten.
Extra Tips:
To achieve the best results, avoid overbaking the cakes; they should have a slightly jiggly center when you take them out of the oven.
You can also prepare the batter ahead of time and refrigerate it in the ramekins. Just add an extra minute or two to the baking time if using chilled batter.
For added flavor, consider incorporating a teaspoon of espresso powder or a splash of orange liqueur into the batter. Enjoy your chocolate lava cakes!
Final Thoughts
As you savor the rich flavors of chocolate lava cake, it’s clear that this dessert is a crowd-pleaser that never fails to impress.
When you’re planning a gathering or a special occasion, remember that desserts can elevate the experience. From simple treats to more elaborate creations, there’s a dessert for every palate and event.
Consider your audience when choosing a dessert. If you know they love fruit, a berry tart or a classic apple pie could be perfect. For chocolate lovers, brownies or a decadent mousse might be the way to go.
Don’t forget about dietary restrictions; offering a gluten-free or vegan option guarantees everyone can indulge.
Presentation matters too. A beautifully plated dessert can make a lasting impression. Use fresh ingredients, vibrant colors, and thoughtful garnishes to enhance your dish. Even a simple scoop of ice cream can be dressed up with a drizzle of sauce or a sprinkle of nuts.
Lastly, don’t hesitate to experiment. Creating new combinations can lead to unique and delightful desserts.
FAQ
When planning your dessert menu, you might’ve questions about ingredients, preparation, or variations. Here are some common FAQs to help you out.
One frequently asked question is about ingredient substitutes. If you’re out of eggs, you can use unsweetened applesauce or mashed bananas. For gluten-free options, consider almond or coconut flour.
Another common query is about preparation time. Most desserts can be made in under an hour, but some, like cheesecakes, require chilling overnight. Make sure to check your recipe ahead of time!
You might also wonder how to store your desserts. Many cakes and cookies can last a few days at room temperature, while pies and custards often need refrigeration. Always use airtight containers to keep them fresh.
If you’re looking for variations, don’t hesitate to experiment. You can add spices, fruits, or even nuts to your recipes for a unique twist.
Finally, don’t forget about dietary restrictions. Many desserts can be easily adjusted to be vegan or nut-free. Just be mindful of the ingredients you choose to use.
Enjoy your dessert-making adventure!
Dessert Ideas
Ingredients
- Ingredients:
- - 1/2 cup unsalted butter
- - 1 cup semi-sweet chocolate chips
- - 2 large eggs
- - 2 large egg yolks
- - 1/4 cup granulated sugar
- - 2 tablespoons all-purpose flour
- - 1/2 teaspoon vanilla extract
- - Pinch of salt
- - Cocoa powder for dusting
Instructions
- Cooking Instructions:
- Preheat your oven to 425°F (220°C). Prepare four ramekins by greasing them with butter and dusting them with cocoa powder to prevent sticking.
- In a microwave-safe bowl, combine the unsalted butter and semi-sweet chocolate chips. Microwave in 30-second intervals, stirring in between, until the mixture is completely melted and smooth.
- In a separate bowl, whisk together the eggs, egg yolks, and granulated sugar until well combined and slightly frothy. This will create a light texture in the cake.
- Gradually pour the melted chocolate mixture into the egg mixture, stirring continuously to avoid cooking the eggs. Add the vanilla extract and a pinch of salt, then fold in the flour until just combined.
- Divide the batter evenly among the prepared ramekins, filling each about 2/3 full. Place the ramekins on a baking sheet for easy handling and bake for 12-14 minutes, or until the edges are firm but the center remains soft.
- Remove the cakes from the oven and let them cool for 1 minute. Carefully invert each ramekin onto a serving plate and gently tap to release the cake. Serve immediately while the center is still molten.
- Extra Tips:
- To achieve the best results, avoid overbaking the cakes; they should have a slightly jiggly center when you take them out of the oven.
- You can also prepare the batter ahead of time and refrigerate it in the ramekins. Just add an extra minute or two to the baking time if using chilled batter.
- For added flavor, consider incorporating a teaspoon of espresso powder or a splash of orange liqueur into the batter. Enjoy your chocolate lava cakes!