Author: admin

baked chicken thighs

baked chicken thighs

Baked Chicken Thighs Baked chicken thighs can be compared to a well-rehearsed performance; when done right, they impress everyone at the table with their crispy skin and tender meat. This dish is not only easy to prepare but also allows for endless flavor combinations. If 

chicken pesto pasta

chicken pesto pasta

Chicken Pesto Pasta Chicken Pesto Pasta is a simple yet satisfying dish that you can prepare in a short amount of time. It combines wholemeal pasta with tender chicken and flavorful basil pesto, providing a balance of protein and carbohydrates. This meal not only supports 

recipes

recipes

Recipes

Recipes are the secret blueprints of culinary masterpieces waiting to be uncovered. They guide you through the process of creating dishes that can amaze your friends and family. By understanding recipes, you’ll discover how to mix flavors, use various techniques, and cater to different dietary needs. With a bit of practice, you can transform simple ingredients into delightful meals. But what makes a recipe truly special? Let’s explore the fascinating world of recipes together.

Why You’ll Love This Recipe

When you plunge into this recipe, you’ll discover a world of flavors and creativity waiting to be explored.

You’ll appreciate the diverse culinary experiences it offers, inspiring you to personalize every detail. As you experiment with new ingredients and techniques, your cooking skills will improve, keeping meals interesting and varied. Cooking encourages exploration of new foods and gives you control over what goes into your dish, allowing you to cater to specific tastes and dietary needs. The joy of cooking comes not just from making meals, but also from sharing them with others.

By inviting friends or family to enjoy your creation, you foster connections and build a sense of community around food.

Ultimately, this recipe is a gateway to exploration and joy in your kitchen.

History

Throughout history, recipes have evolved alongside human culture and technology, shaping the way we cook and eat. In the prehistoric period, the discovery of fire allowed early humans to roast and boil food, although no specific recipes were recorded. As time progressed, from the 5th to the 15th century, new ingredients like bok choy and cod emerged, influencing diets globally. The Renaissance introduced more sophisticated dishes, such as soufflé and egg nog, reflecting culinary creativity. Notably, the earliest evidence of bread-making dates back to 14,400 years ago, showcasing the long-standing tradition of creating recipes. By the 20th century, fast food and instant meals changed how you think about cooking. Innovations like conveyor belt sushi and cultured meat show how recipes continue to adapt. Understanding this history helps you appreciate the meals you enjoy today.

Recipe

Recipes_0001.jpg

Ingredients:
– 400g spaghetti
– 6 cloves of garlic, thinly sliced
– 100ml extra virgin olive oil
– 1 teaspoon red pepper flakes
Salt, to taste
Fresh parsley, chopped (for garnish)
Grated Parmesan cheese (optional)

Instructions:
1. Bring a large pot of salted water to a boil. Add the spaghetti and cook according to package instructions until al dente. Reserve 1 cup of pasta water, then drain the spaghetti and set aside.

  1. In a large skillet over medium heat, add the olive oil. Once hot, add the sliced garlic and sauté until golden brown, being careful not to burn it, about 2-3 minutes.
  2. Add the red pepper flakes to the skillet and stir for about 30 seconds to release their flavor.
  3. Add the drained spaghetti to the skillet, tossing it with the garlic and oil mixture. If the pasta seems dry, gradually add some reserved pasta water until the desired consistency is reached.
  4. Season with salt to taste and remove from heat. Toss in the chopped parsley for freshness before serving.
  5. Serve immediately, garnished with grated Parmesan cheese if desired.

For the best results, use high-quality extra virgin olive oil and fresh garlic. Clear instructions contribute to successful recipe execution.

If you want to enhance the dish, consider adding a squeeze of lemon juice or zest for brightness.

Additionally, you can customize the heat level by adjusting the amount of red pepper flakes according to your preference.

Enjoy your meal!

Final Thoughts

As you reflect on the recipes that have been passed down through generations, it’s clear that they hold a special place in our hearts and kitchens.

These cherished dishes aren’t just about ingredients; they carry stories, memories, and traditions. Over time, recipes evolve, adapting to personal tastes and cultural influences. Each family adds its unique touch, ensuring that these recipes remain relevant and meaningful. The act of cooking together fosters strong family bonds and creates a sense of warmth and comfort. Canned goods allow for quick meal preparation, making it easier to enjoy these cherished recipes despite busy lifestyles. Documenting personal adaptations not only preserves these traditions but also honors the legacy of those who came before us.

FAQ

Cooking can be a rewarding experience, but it often comes with questions and challenges. You might wonder why your dish didn’t turn out as expected. One common issue is ingredient substitutions; they can change the taste and texture.

It’s best to follow the recipe exactly, especially when you’re starting out. Also, don’t forget to measure your ingredients accurately. Using digital scales and measuring cups can help. If you skip key ingredients or mix them out of order, your dish might suffer. Additionally, knowing your audience can help tailor recipes to suit different cooking skill levels and preferences.

Remember, open the oven door sparingly to maintain temperature. Finally, always read the recipe thoroughly before starting. If you run into trouble, recheck the instructions and your ingredient list.

Happy cooking!

Recipes

Ingredients
  

  • Ingredients:
  • - 400g spaghetti
  • - 6 cloves of garlic thinly sliced
  • - 100ml extra virgin olive oil
  • - 1 teaspoon red pepper flakes
  • - Salt to taste
  • - Fresh parsley chopped (for garnish)
  • - Grated Parmesan cheese optional

Instructions
 

  • Instructions:
  • Bring a large pot of salted water to a boil. Add the spaghetti and cook according to package instructions until al dente. Reserve 1 cup of pasta water, then drain the spaghetti and set aside.
  • In a large skillet over medium heat, add the olive oil. Once hot, add the sliced garlic and sauté until golden brown, being careful not to burn it, about 2-3 minutes.
  • Add the red pepper flakes to the skillet and stir for about 30 seconds to release their flavor.
  • Add the drained spaghetti to the skillet, tossing it with the garlic and oil mixture. If the pasta seems dry, gradually add some reserved pasta water until the desired consistency is reached.
  • Season with salt to taste and remove from heat. Toss in the chopped parsley for freshness before serving.
  • Serve immediately, garnished with grated Parmesan cheese if desired.
  • For the best results, use high-quality extra virgin olive oil and fresh garlic. Clear instructions contribute to successful recipe execution.
  • If you want to enhance the dish, consider adding a squeeze of lemon juice or zest for brightness.
  • Additionally, you can customize the heat level by adjusting the amount of red pepper flakes according to your preference.
dinner recipe ideas

dinner recipe ideas

Dinner Recipe Ideas Have you ever wondered if simple ingredients can lead to amazing dinner recipes? It’s true; with just a few versatile items, like chicken or salmon, you can create a variety of flavorful dishes. By adding seasonal vegetables and experimenting with different spices, 

food ideas on a budget

food ideas on a budget

Food Ideas on a Budget Imagine walking through a vibrant market, colorful fruits, and fresh vegetables beckoning you to create tasty meals. Eating well on a budget isn’t just possible; it’s also enjoyable. You can whip up delicious dishes using simple, affordable ingredients like beans 

christmas cookies

christmas cookies

Christmas Cookies

When you bake gingerbread cookies shaped like stars or trees, you’re not just making treats; you’re participating in a time-honored tradition. These cookies can be fun to decorate and share, creating a sense of community and joy. Each cookie has a story, often tied to family recipes or cultural customs. Understanding the history behind these delightful sweets can enhance your appreciation. So, what makes Christmas cookies so special, and how can you make your own?

Why You’ll Love This Recipe

When you immerse yourself in this Christmas cookie recipe, you’ll discover a delightful mix of flavors and textures that make baking a joy.

You’ll love how the cookies blend crunchy, chewy, and crumbly textures, creating an enjoyable experience. By incorporating healthier ingredients like nuts and seasonal fruits, you’ll not only enhance the taste but also boost the nutritional value. For instance, using oats adds fiber, while dark chocolate offers antioxidants. Additionally, incorporating dried cherries provides potassium and vitamins, making your treats even more nutritious. Plus, you can opt for gluten-free flours to cater to dietary needs.

As you prepare your cookie platter, choosing a variety of cookies guarantees everyone finds something they enjoy. Remember to keep strong-flavored cookies separate to preserve their unique tastes, making your holiday baking both delicious and thoughtful.

History

Baking Christmas cookies isn’t just a modern tradition; it has a rich history that dates back to Medieval Europe. During this time, the introduction of spices through trade routes transformed simple baked goods into special treats. Ingredients like almonds and dried fruits became common, enhancing flavors in festive recipes. German monks created lebkuchen, while Swedish bakers made pepparkakor, both of which are now traditional Christmas cookies. By the 13th century, gingerbread emerged as a holiday favorite, particularly in Germany. The late 17th century brought tin cookie cutters, allowing bakers to create beautiful shapes. Cookie cutters became widely available in the U.S. between 1871 and 1906, further popularizing the crafting of festive cookies. As immigrants arrived in America, they brought their cookie recipes, blending them with local customs, which shaped the diverse cookie traditions we enjoy today.

Recipe

Christmas_Cookies_0001.jpg

Ingredients:
– 3 cups all-purpose flour
– 1 cup butter, softened
– 1 cup granulated sugar
– 1 egg or 2 egg yolks
– 1 to 2 teaspoons vanilla extract
– 1/2 teaspoon almond extract (optional)
– 1/2 cup cornstarch (optional)
– 1 to 3/4 teaspoon baking powder (optional)
– 1/2 teaspoon salt (optional)
– 1/3 cup milk (optional)

Instructions:
1. In a large mixing bowl, cream together the softened butter and granulated sugar until the mixture is light and fluffy. This usually takes about 3-5 minutes. Add in the egg or egg yolks and vanilla extract, mixing well to combine.

  1. Gradually add the all-purpose flour to the wet ingredients, mixing until just combined. If using, incorporate almond extract, cornstarch, baking powder, and salt at this stage. The dough should be soft but not sticky.
  2. Divide the dough into two equal portions and wrap each in plastic wrap. Chill in the refrigerator for at least 2 hours or up to 2 days. This step helps the cookies maintain their shapes while baking.
  3. Preheat your oven to 350 degrees Fahrenheit. Line baking sheets with parchment paper. Once the dough is chilled, roll it out on a lightly floured surface or between two sheets of parchment paper to about 1/8-inch thickness.
  4. Use Christmas cookie cutters to cut out shapes from the rolled dough and transfer them to the prepared baking sheets. Bake in the preheated oven for 8 to 10 minutes, or until the edges are lightly browned.
  5. Remove the cookies from the oven and let them cool on the baking sheets for a few minutes before transferring them to wire racks to cool completely. For those looking to elevate their cookie decorating game, consider using royal icing and food coloring to create beautiful designs. These cookies freeze beautifully, making them ideal for holiday gatherings. Remember to adjust the consistency of your icing with a little milk if needed, and don’t forget to have fun with sprinkles and edible decorations!

Enjoy the process of baking and decorating these festive cookies, and most importantly, share the joy with everyone around you.

Final Thoughts

The joy of making Christmas cookies is a wonderful way to create lasting memories with family and friends. As you gather ingredients, remember that this tradition has deep historical roots, from medieval Europe to modern-day celebrations. Baking cookies isn’t just about flavor; it’s about sharing symbols and stories. Each cookie shape can carry meaning, like stars for the Star of Bethlehem. You can also explore different cultural recipes, learning how families across the world celebrate. Gingerbread’s introduction to Europe has influenced the variety of cookies enjoyed during the holiday season.

Embrace the spirit of generosity by sharing your cookies with neighbors or leaving some for Santa, a tradition that teaches kindness. Ultimately, the time spent baking fosters connection, making your holiday season more special and memorable. Enjoy every moment!

FAQ

What do you need to know about Christmas cookies?

First, store your cookies in separate cellophane bags to prevent them from absorbing odors and moisture, which can ruin their flavors. Always use high-quality ingredients, especially butter at room temperature for the best dough consistency. Additionally, using unsalted butter enhances the flavor of your cookies. Chill your cookie dough before baking for better texture. When decorating, royal icing and sprinkles add a festive touch, while gel paste food coloring guarantees vibrant results. For presentation, mix cookie shapes like stars and trees. Remember to keep baked cookies in airtight containers to maintain freshness, and consider freezing dough for longer storage. Finally, wrap gifts in bakery boxes with ribbons for a lovely appearance.

Christmas Cookies

Ingredients
  

  • Ingredients:
  • - 3 cups all-purpose flour
  • - 1 cup butter softened
  • - 1 cup granulated sugar
  • - 1 egg or 2 egg yolks
  • - 1 to 2 teaspoons vanilla extract
  • - 1/2 teaspoon almond extract optional
  • - 1/2 cup cornstarch optional
  • - 1 to 3/4 teaspoon baking powder optional
  • - 1/2 teaspoon salt optional
  • - 1/3 cup milk optional

Instructions
 

  • Instructions:
  • In a large mixing bowl, cream together the softened butter and granulated sugar until the mixture is light and fluffy. This usually takes about 3-5 minutes. Add in the egg or egg yolks and vanilla extract, mixing well to combine.
  • Gradually add the all-purpose flour to the wet ingredients, mixing until just combined. If using, incorporate almond extract, cornstarch, baking powder, and salt at this stage. The dough should be soft but not sticky.
  • Divide the dough into two equal portions and wrap each in plastic wrap. Chill in the refrigerator for at least 2 hours or up to 2 days. This step helps the cookies maintain their shapes while baking.
  • Preheat your oven to 350 degrees Fahrenheit. Line baking sheets with parchment paper. Once the dough is chilled, roll it out on a lightly floured surface or between two sheets of parchment paper to about 1/8-inch thickness.
  • Use Christmas cookie cutters to cut out shapes from the rolled dough and transfer them to the prepared baking sheets. Bake in the preheated oven for 8 to 10 minutes, or until the edges are lightly browned.
  • Remove the cookies from the oven and let them cool on the baking sheets for a few minutes before transferring them to wire racks to cool completely. For those looking to elevate their cookie decorating game, consider using royal icing and food coloring to create beautiful designs. These cookies freeze beautifully, making them ideal for holiday gatherings. Remember to adjust the consistency of your icing with a little milk if needed, and don't forget to have fun with sprinkles and edible decorations!
  • Enjoy the process of baking and decorating these festive cookies, and most importantly, share the joy with everyone around you.
tomato basil pasta

tomato basil pasta

Tomato Basil Pasta Tomato Basil Pasta is a classic dish that highlights the vibrant flavors of fresh ingredients. It’s not just tasty; it’s also nutritious and easy to make. This recipe has a rich history and can be adapted for various diets. If you’re curious 

4 ingredient sourdough bread

4 ingredient sourdough bread

4 Ingredient Sourdough Bread Making 4 Ingredient Sourdough Bread is a straightforward process that anyone can master. All you need is flour, water, salt, and a sourdough starter. You’ll mix these ingredients to create a dough, let it rise, and then bake it. This method 

cheap family meals under $10

cheap family meals under $10

Cheap Family Meals Under $10

If you’re looking to feed your family without spending a fortune, cheap meals under $10 are a smart choice. These meals often use affordable ingredients like rice, pasta, and beans, which can stretch your budget. You can also incorporate seasonal produce for added nutrition. By planning around sales, you can create delicious dishes that fill everyone up. Curious about specific recipes and tips to make the most of your budget?

Why You’ll Love This Recipe

When you choose budget-friendly recipes, you’re not just saving money; you’re also gaining a variety of benefits that can enhance your cooking experience.

First, affordable ingredients like rice, pasta, and beans allow you to keep costs low while still enjoying delicious meals. By buying in bulk and focusing on seasonal produce, you can maximize flavor and savings.

Plus, these recipes often promote versatility in meal planning, helping you stretch ingredients across several dishes. You’ll also enjoy the nutritional benefits of homemade meals, which foster healthier eating habits and teach portion control. Additionally, bulk buying can lead to significant savings on staple items, making it easier to create delicious family meals without breaking the bank.

Ultimately, cooking at home saves money compared to dining out, and it’s a great way to develop valuable cooking skills with your family.

History

The history of cheap family meals reveals how communities have adapted their cooking practices over time to meet economic challenges and nutritional needs.

In the late 19th century, the New York Cooking School showed families how to prepare meals for just three dollars a week. Traditionally, working-class families focused on simpler meals in the afternoon, reserving lighter fare for lunch and dinner. Juliet Corson’s pamphlet emphasized the importance of providing nutritious meals for poor working-class families.

During tough times, like the Great Depression, housewives creatively managed budgets, often using processed foods to stretch resources. They prioritized wholesome ingredients, like fresh produce, to avoid nutritional deficiencies.

Techniques like reheating stocks with added vegetables showcased their resourcefulness. This history highlights how families have continually found ways to provide nutritious meals without breaking the bank.
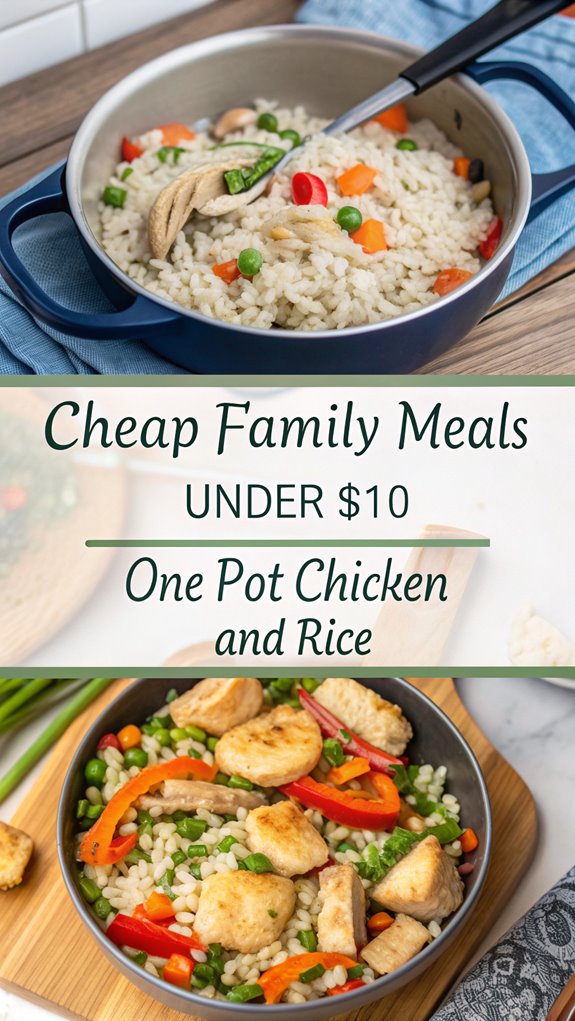
Recipe

Cheap_Family_Meals_Under_10_0001.jpg

Ingredients:
– 4 chicken thighs (bone-in, skin-on or skinless)
– 1 cup long-grain rice
– 2 cups chicken broth
– 1 cup mixed vegetables (carrots, peas, corn)
– 1 onion, chopped
– 2 cloves garlic, minced
– 1 teaspoon paprika
– 1 teaspoon salt
– 1/2 teaspoon black pepper
– 2 tablespoons olive oil
Fresh parsley, for garnish (optional)

Cooking Instructions:
1. In a large pot, heat olive oil over medium heat. Add the chopped onion and cook until it becomes translucent, about 3-4 minutes.

  1. Add the minced garlic and cook for an additional minute, until fragrant.
  2. Push the onions and garlic to the side of the pot and place the chicken thighs skin-side down in the center. Season the chicken with paprika, salt, and black pepper. Sear the chicken for 4-5 minutes on each side, until golden brown.
  3. Once the chicken is browned, add the rice to the pot and stir to combine with the onion and garlic mixture.
  4. Pour in the chicken broth and bring to a gentle boil.
  5. Reduce the heat to low, cover the pot, and let it simmer for about 20 minutes, or until the rice is cooked and has absorbed most of the liquid.
  6. After 20 minutes, add the mixed vegetables on top of the rice without stirring. Cover the pot again and cook for an additional 5-7 minutes, until the vegetables are heated through and the chicken is cooked to an internal temperature of 165°F.
  7. Once cooked, remove from heat and let it sit, covered, for an additional 5 minutes. Fluff the rice with a fork and serve the chicken and rice garnished with fresh parsley, if desired.

Extra Tips:
When making One Pot Chicken and Rice, feel free to customize the vegetables based on what’s in season or what you have on hand. Additionally, this dish is a hearty and delicious meal that combines rich, flavorful rice with seasoned chicken, making it perfect for weeknight dinners.

You can also use boneless chicken thighs for quicker cooking. For added flavor, consider marinating the chicken in your favorite spices or sauces before cooking.

Finally, if you have leftovers, this dish reheats well and can be enjoyed for lunch the next day!

Final Thoughts

As you plan meals for your family on a budget, remember that being organized and resourceful can make a big difference. Start by tailoring your shopping list to your family’s eating habits and current pantry items. Use cost comparisons to choose ingredients wisely, focusing on items that are both affordable and nutritious. Buying in bulk can save money on staples, while simple recipes keep things straightforward. Consider incorporating dishes like Spanish Rice Soup that are both nutrient-dense and budget-friendly. Don’t forget to repurpose leftovers to create new meals, reducing waste and stretching your budget. Flexibility is key; adapt your meal plans based on ingredient availability.

FAQ

When planning budget-friendly meals for your family, questions often arise about the best strategies and resources to use.

First, check what you already have in your pantry and fridge. This helps cut down on grocery costs.

Next, plan meals around sales and promotions to maximize your budget. Utilizing your kitchen inventory can lead to further savings and reduce food waste.

Consider using whole ingredients instead of processed ones, as they can be cheaper and healthier.

Create versatile meals with common ingredients to save time and effort.

Don’t forget to write tailored shopping lists based on your family’s preferences.

Finally, explore online resources like Budget Bytes or the Kroger blog for inspiration and recipes that keep meals under $10.

These strategies can help you eat well without breaking the bank.

Cheap Family Meals Under $10

Ingredients
  

  • Ingredients:
  • - 4 chicken thighs bone-in, skin-on or skinless
  • - 1 cup long-grain rice
  • - 2 cups chicken broth
  • - 1 cup mixed vegetables carrots, peas, corn
  • - 1 onion chopped
  • - 2 cloves garlic minced
  • - 1 teaspoon paprika
  • - 1 teaspoon salt
  • - 1/2 teaspoon black pepper
  • - 2 tablespoons olive oil
  • - Fresh parsley for garnish (optional)

Instructions
 

  • Cooking Instructions:
  • In a large pot, heat olive oil over medium heat. Add the chopped onion and cook until it becomes translucent, about 3-4 minutes.
  • Add the minced garlic and cook for an additional minute, until fragrant.
  • Push the onions and garlic to the side of the pot and place the chicken thighs skin-side down in the center. Season the chicken with paprika, salt, and black pepper. Sear the chicken for 4-5 minutes on each side, until golden brown.
  • Once the chicken is browned, add the rice to the pot and stir to combine with the onion and garlic mixture.
  • Pour in the chicken broth and bring to a gentle boil.
  • Reduce the heat to low, cover the pot, and let it simmer for about 20 minutes, or until the rice is cooked and has absorbed most of the liquid.
  • After 20 minutes, add the mixed vegetables on top of the rice without stirring. Cover the pot again and cook for an additional 5-7 minutes, until the vegetables are heated through and the chicken is cooked to an internal temperature of 165°F.
  • Once cooked, remove from heat and let it sit, covered, for an additional 5 minutes. Fluff the rice with a fork and serve the chicken and rice garnished with fresh parsley, if desired.
  • Extra Tips:
  • When making One Pot Chicken and Rice, feel free to customize the vegetables based on what's in season or what you have on hand. Additionally, this dish is a hearty and delicious meal that combines rich, flavorful rice with seasoned chicken, making it perfect for weeknight dinners.
  • You can also use boneless chicken thighs for quicker cooking. For added flavor, consider marinating the chicken in your favorite spices or sauces before cooking.
  • Finally, if you have leftovers, this dish reheats well and can be enjoyed for lunch the next day!
recipe ideas dinner

recipe ideas dinner

Recipe Ideas Dinner When it comes to mealtime, you might want to explore some straightforward yet delicious recipe ideas for dinner. It’s all about finding meals that are quick to prepare and please a variety of tastes. From vibrant stir-fries to creamy pasta or fresh